
The different versions of webAR
Contents
As promised in my last post, we are back today with the first user-accessible demo of our Web AR solution. Actually, we’ve prepared two different demos, but before we get to the fun part a little bit of theory.
Web AR can be utilized for a variety of use-cases, that’s why I’d like to distinguish between the different ways Web AR can be used in Onirix. As you can see in the infographic below, the general separation between the different types of AR experiences is Scene View and Asset View.
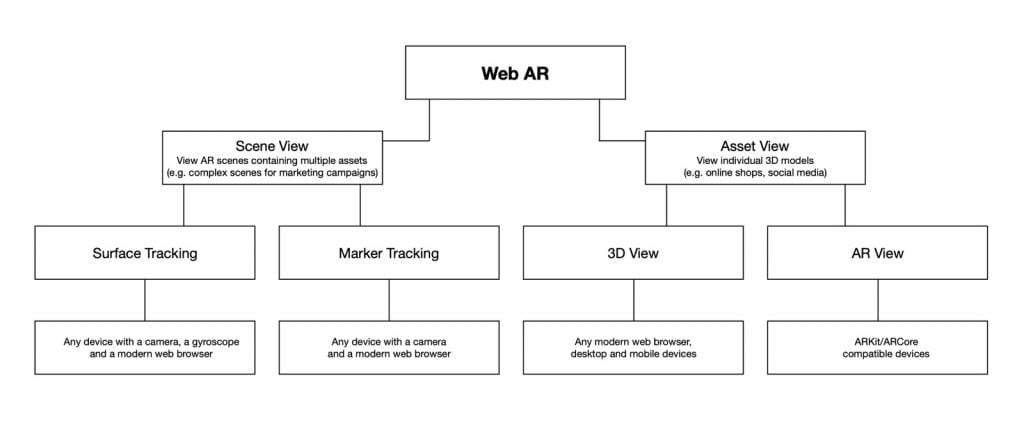
Asset view
The asset view is meant to display individual 3D objects. This is useful for online shops, social media, or wherever only one 3D model is required. The asset view is available as a 3D view on both desktop and mobile devices, and as an AR view on ARKit/ARCore compatible devices.
Web AR demo: asset view
Onirix allows you to view the model of a 3D experience on both mobile devices and desktop computers. If the demo is viewed on a newer device with ARKit/ARCore, AR view is also available to view the object in AR. The display may vary slightly depending on whether your device is Android or iOS, but the process is exactly the same.
However, if you are viewing this demo on a more recent mobile device that has ARKit/ARCore, the AR view is also available which allows you to view this in AR. This looks slightly different, depending on if you are on Android or iOS but the process works the same.
The first time, the software might ask you for permission to access your camera and is then trying to detect a surface (e.g. the floor or a table) to place the content on. For that purpose, you might have to move your device a little until a surface is recognized.
Scene view
Experiences that use scene view are created with our Scene Designer and are meant for more complex AR experiences that contain multiple elements (also called “assets”) like 3D models, sound, video images, etc.. These type of experiences are typically used for AR marketing campaigns or AR business cards.
This type of Web AR makes use of surface and image tracking like it is also being used for app-based experiences. The difference is that this works pretty much with any mobile device that uses a modern web browser and has a gyroscope.
Web AR demo: image tracking
To try the demo, you need Chrome on Android or Safari on iOS. Chrome on iOS is not yet available due to security restrictions in iOS – it simply doesn’t allow Chrome to access the camera. I believe that this is going to be resolved soon though.
For the best experience, I’d recommend to download the image from here and print it. If you just want to give it a quick try, you can use the image below on your screen instead.

- Open the Web AR URL on your smartphone
- Be patient. Depending on your internet connection, it still takes a few seconds to load. But remember that this is a beta version. The finished product will work instantaneously.
- Grant camera access
- Scan the image
In case you are on a desktop computer, you can hold the image in front of your webcam, but it makes the whole experience a little awkward.
We’ll be back with more soon.
